Synopsis: Understanding how the Visual Studio Code View and Designer View function together.
Visual Studio operates in a hand shaking technique. There are two layers commonly used with each form: The Designer View and the Code View. Programming with Visual Studio requires a basic understanding on how the data is processed between the two. The Designer View is the operator interface is where the data is reviewed and updated. The Code View responds to the form requirements to load the data and the operator enters data which the code processes.
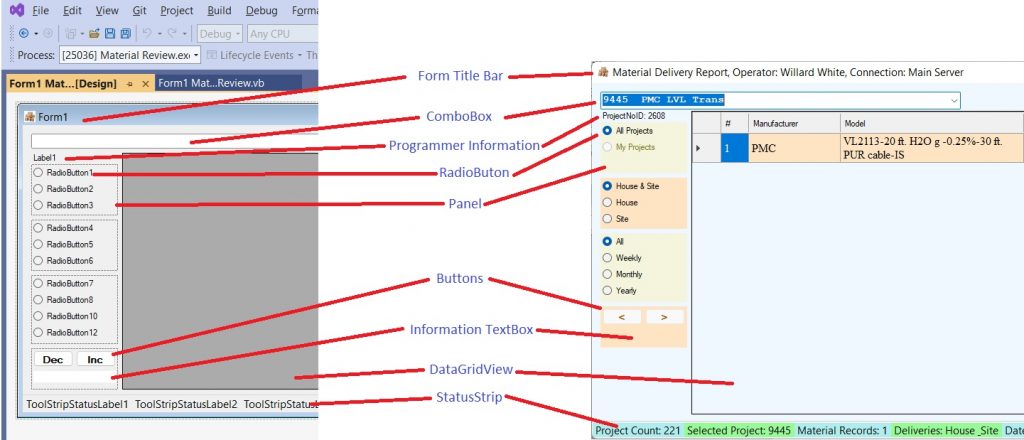
Detail 1 shows the Visual Studio development form and after debugging a functional window. The left side shows the tools physically positioned before compiling. Optionally, the tools could be either programmatically created and positioned or haphazardly placed on the design form and programmatically positioned. My preferred development method is to physically position tools where they will be used in the running program. Not all of my programs strictly follow my preference. There have been many cases where the tools are repositioned upon program initialization.
In Detail 1, notice that the left side is basically grayscale while the right side is colored. The coloring on this program is performed programmatically, that is within the VB code worksheet. Upon build, the tools are provided with color options. Additionally, the tools (Buttons, Panels, Form, DataGridVew, Buttons, et. al.) can be assigned colors and many other attributes in the properties window, selectable by right-clicking on the tool and selecting Properties.
Detail 2 – The two parts of the Visual Studio programming method are the Code View and the Designer View. The two views communicate via the handshaking method.
Detail 2 is a comparison of the code view and the designer view. The two views work together by handshaking. The Code View is the input and output side handled by the operator. Depending on selections (input options) the DataGridView will be the output and display relevant data. Always consider, the display of no data (available records fitting within the search parameters) is relevant data. Detail 1’s right side is the result of default data selection: Select All Available Data, shown by the RadioButtons House & Site and All as selected. Notice the Buttons are grayed (not selectable) because there is no purpose to increment or decrement time span review unless one of the other options are selected.
The Combobox
In loading projects, depending on who is operating the program, a decision tree, Flowchart 1, is enacted to determine which projects to load. If the operator is a project manager, then the assigned projects are loaded. Otherwise, all projects are loaded. Automating redundant actions, such as selecting a Load Projects button to inform the program what to do when the program’s only purpose is to review projects, then removes an irritation that would develop with the application.
In Detail 1 the ComboBox is in the upper left-hand corner. In PLC programming, the format is to start in the upper left corner and progresses through programming towards the lower right corner. Maintaining the customary thought flow, my programs have continued with the same format throughout.
The first step in generating a project specific report is to select the project. The ComboBox is an input/output (I/O) tool. The user selects the project (input) and the selection is displayed (output). There is code behind the ComboBox which is on the Code View. Due to built-in handshaking, when the Combobox selection is complete, the Designer View handshakes with the Code View to product a result.
In Detail 3 the code to populate the ComboBox is shown with a group of collections. The combobox is requested to populate when the program is initiated along with the default project list of either Mine or All projects per the selected RadioButton. Automating processes on programs had the convenience of simplifying basics tasks. The most basic task in a project-oriented organization was to populate the project upon action request.
Detail 4 is a subroutine option that handles a Selected Index Change from ComboBox1. In this subroutine, the StatusStrip tool at the bottom of the form is updated, a subroutine is called to assemble data into a datagridview, the radiobuttons are reviewed, and the programmer is updated if he is running the program.
Notice the ToolStripStatusLabel is updated by referenceing data in a collection: projectNoCollection(ComboBox1.SelectedIndex + 1). In Detail 3 there is a list of collections. The combobox index is referenced in the collection projectIDCollection and incremented by 1. To collect the material, the subroutine DGV1_AssembleData is called.
The projectIDCollection contains the project’s primary key identifier. The primary key is sequential in the database table. The project number may not be sequential, but it still should be unique in the table’s column. However, the choice was made to use the table’s record number as the primary key as this is generated by the database and is not dependent on passed in information, such as the project number.
Reviewing the tables in Detail 5, notice the key symbol for Primary Key and when the primary key is linked to another table, it is the foreign key in the other table. The SQL command to link though the database tables uses INNER JOINS on the ProjectDataSheet table to the Requisition table to the Item table. Not shown, is the PurchaseOrder table, where the PK is also in the MaterialList table. A table supposedly can have more than one PK or FK. I have never found a need to have more than one PK, but as can be witnessed with the MaterialList table, there are three (3) Foreign Keys, shown as ReqID, PurchaseOrderID, and ItemID.
Following the handshaking, the datagridview is populated with material fitting the selection parameters of delivery and date. Detail 1, right side.
Handshaking can be seen as a selection in the Project No Combobox, when a project is selected, produces an action in the program to pull material for display. Tables not shown here are the PurchaseOrder table and the Received table. As a side note, not all tables are joined with INNER JOINS. If material is not purchased, then the PurchaseOrder table would be joined by an LEFT OUTER JOIN if the display was to show the purchase order number. However, to show material with and without material received dates, the Received table would be joined with a LEFT OUTER JOIN. to ensure records without data would still be pulled and displayed, unless there is a date range selected. Selecting a date range by a RadioButton, another handshake operation, will instruct the program to re-collate the data. Likewise, the location radiobutton set (House & Site) and the increment/decrement (<, >) buttons are handshakes also. A click on a button, combobox, or radiobutton areas will produce a programmatic reaction. The combobox will show the selection. A radiobutton will show checked. The status bar will update. The datagridview may or may not show material.